ARA Portal Features
ARA Networking
Virtual Networks in ARA
As mentioned in Networking for ARA Resources ARA provides options for users to create virtual networks, which can be used for containers to communicate between each other or to the Internet. Network resources in ARA can be accessed via the Project -> Networks -> Network tab. The tab lists all networks available in the project.
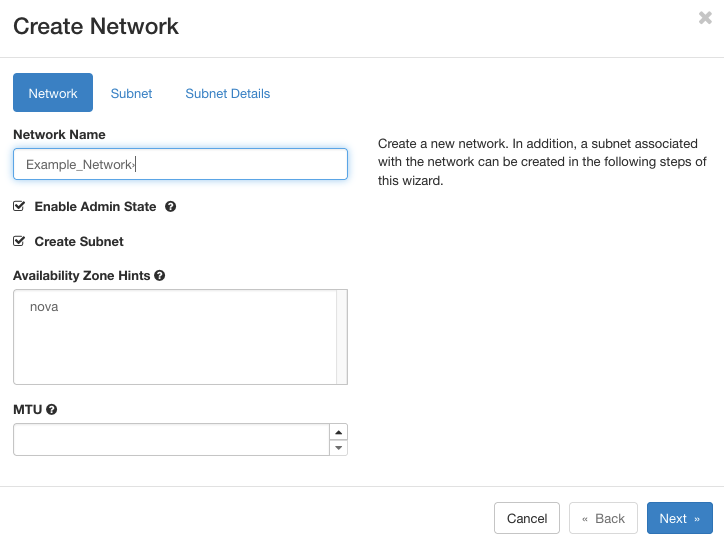
In order to create a virtual network, click on the Create Network button on the top-right of the page. In the form, a user needs to provide a name, say Example_Network, for the virtual network. The network can be enabled by default by selecting Enable Admin State. A virtual network is not valid unless at least a subnet exists under the network. The subnet can be created along with a network by selecting Create Subnet. In addition, user can restrict the network properties such as availability zone (which is set to nova by default) and Maximum Transmission Unit (MTU).
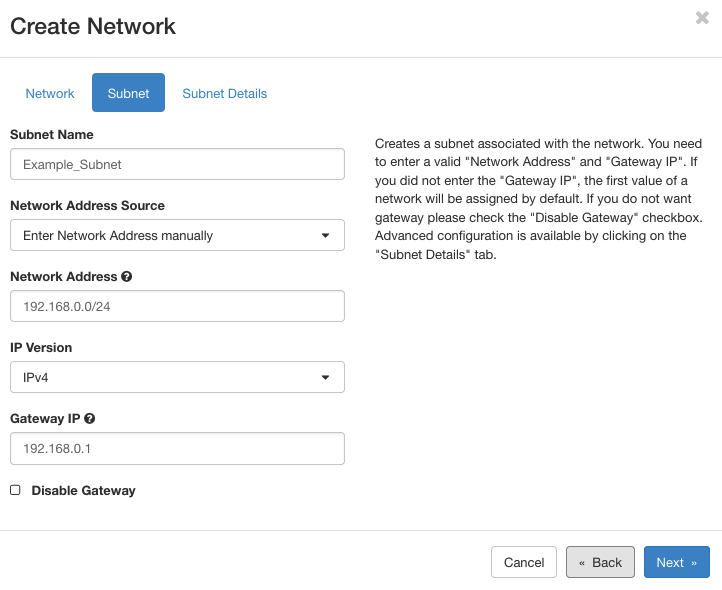
Similar to network, for subnets user needs to provide a name, say Example_Subnet as shown in the figure below. For the network addressing, users have two options: (1) custom pool and (2) existing pool. For custom addressing, we need to specify a subnet, such as 192.168.0.0/24, and provide the IP version and gateway. In this case, the containers will be allotted with IP addresses from the pool (e.g., 192.168.0.2, 192.168.0.3, and so on.). In case of existing pool, containers are assigned with IP addresses from the pool provide by ARA. In the Subnet Details tab, users can provide the IP allocation scheme (such as DHCP) with a valid IP address range, IP address of the DNS name servers, and host routers if any.
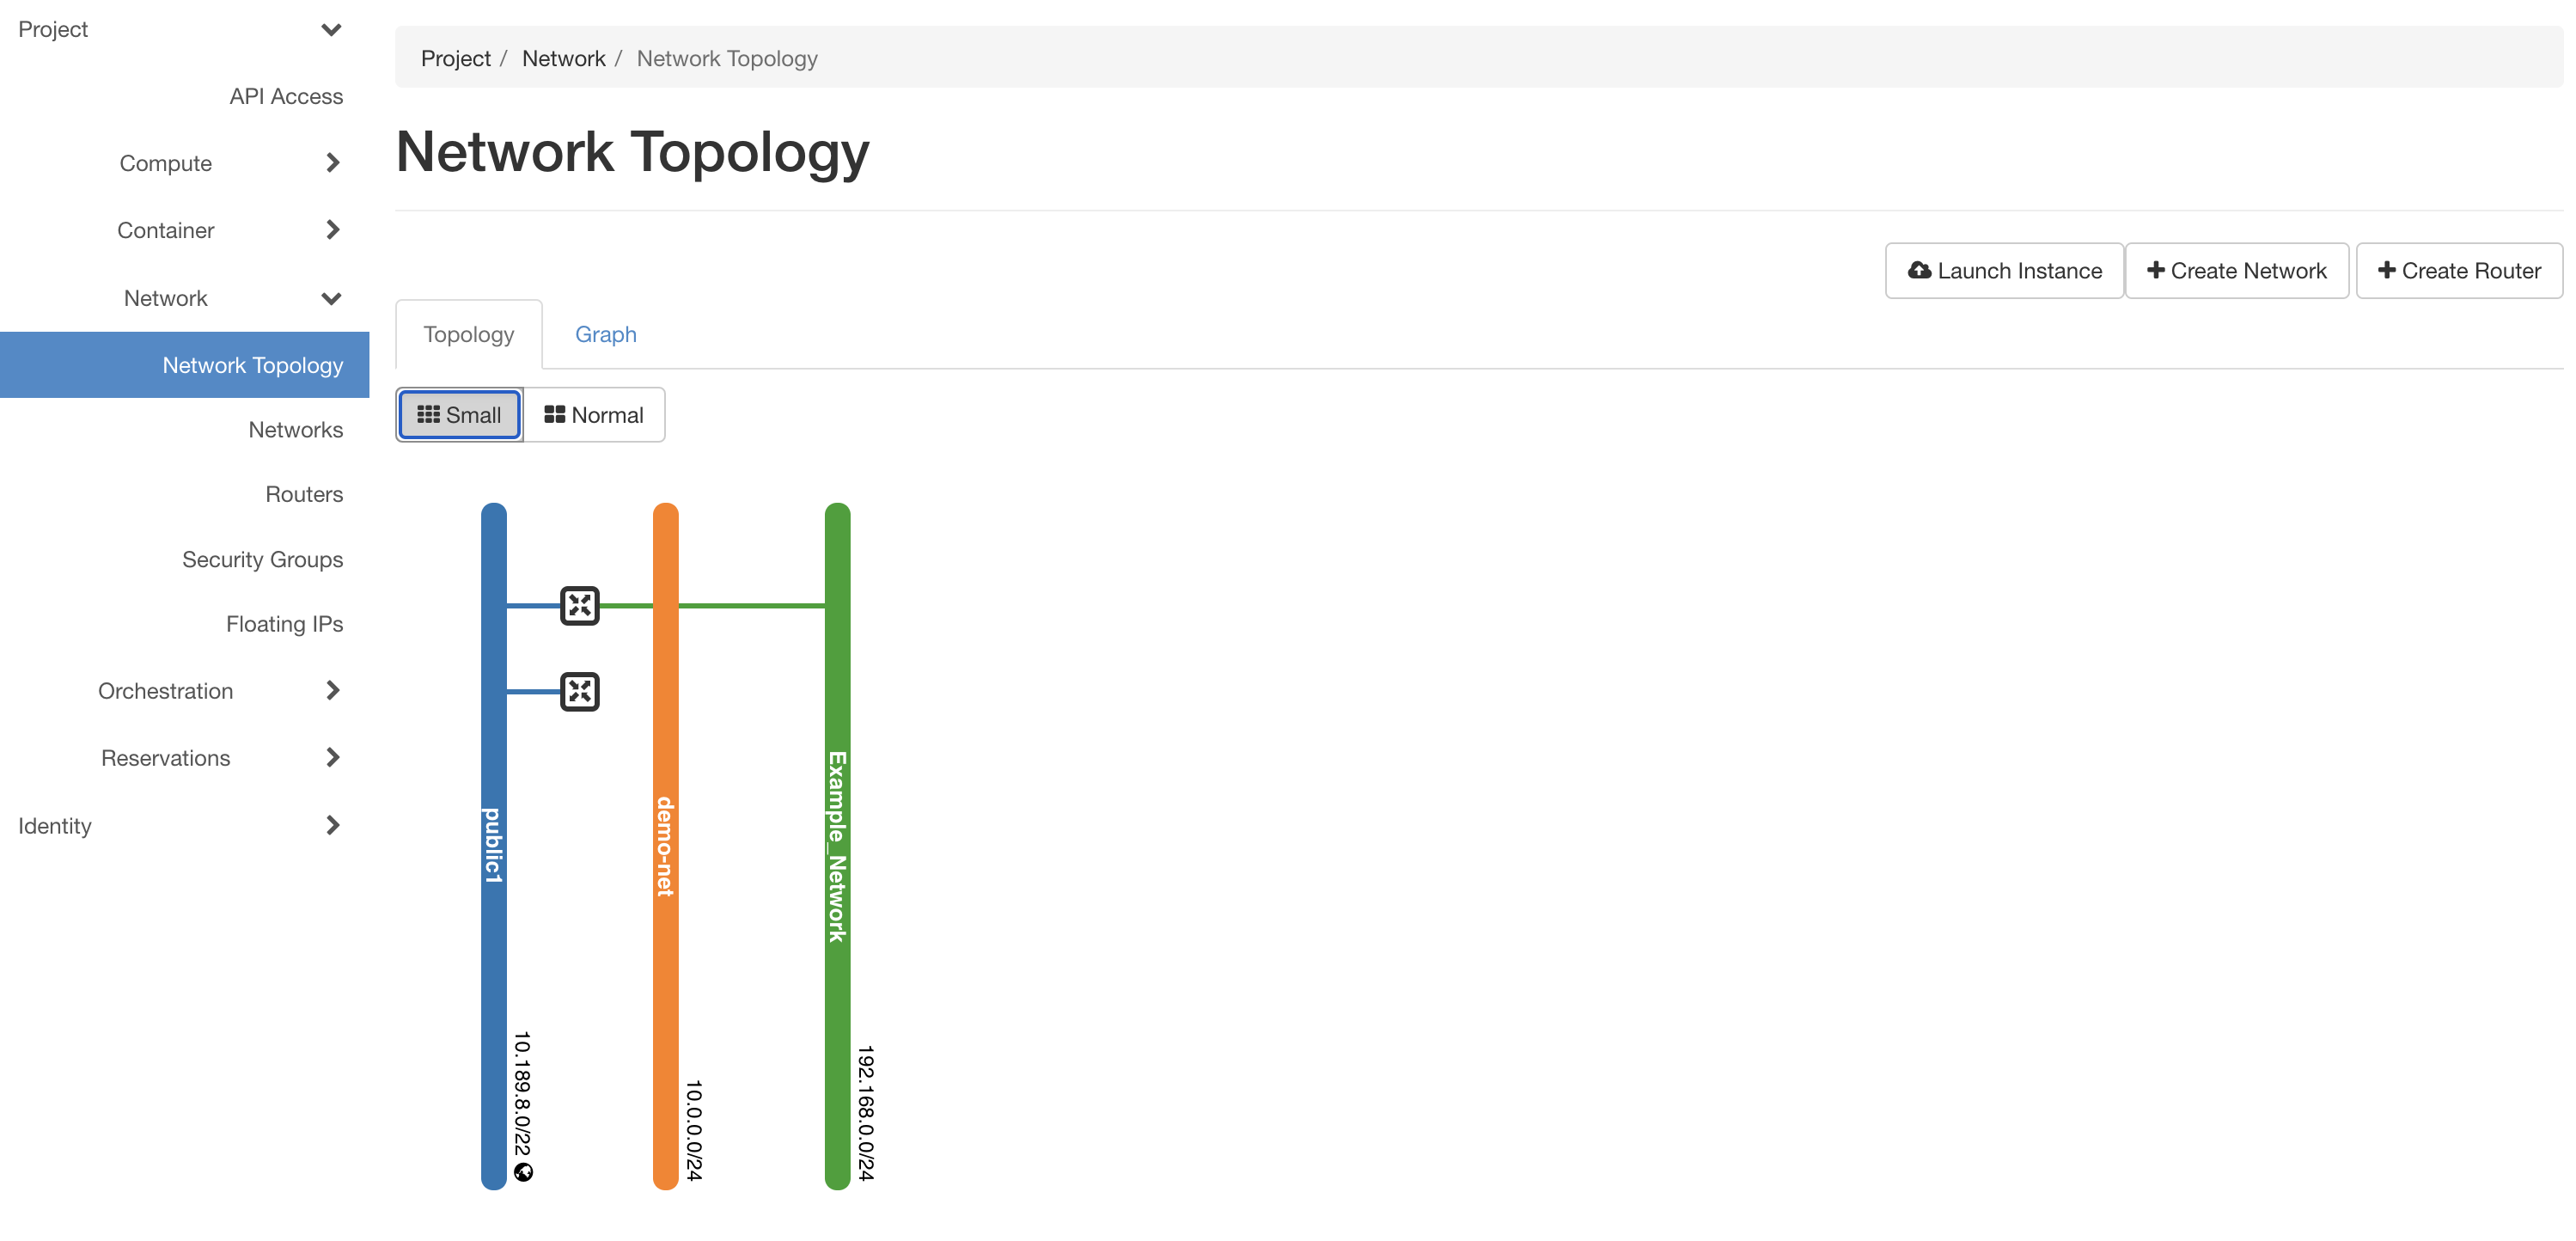
On creating the network and subnet, the network will be visible in the network topology (in topology mode or in graph mode) tab under Project -> Network -> Network Topology as shown in the figure below. Further, the network will be listed in the network tab while creating containers and users can attach the network to the containers.
Virtual Routers in ARA
Creating a single network allows containers attached to it to communicate between each other. The network serves as a private and isolated network for the user. In order to communicate with containers in any other network or to Internet, the network should be attached to another network via routers. Routers in ARA are managed using the Project -> Network -> Routers tab. From the top-right, click on the Create Router button for creating a router. In the form, a name, Example_Router, can be given to the router. In case, the network needs Internet, an external network (such as public1) can connected to the network.
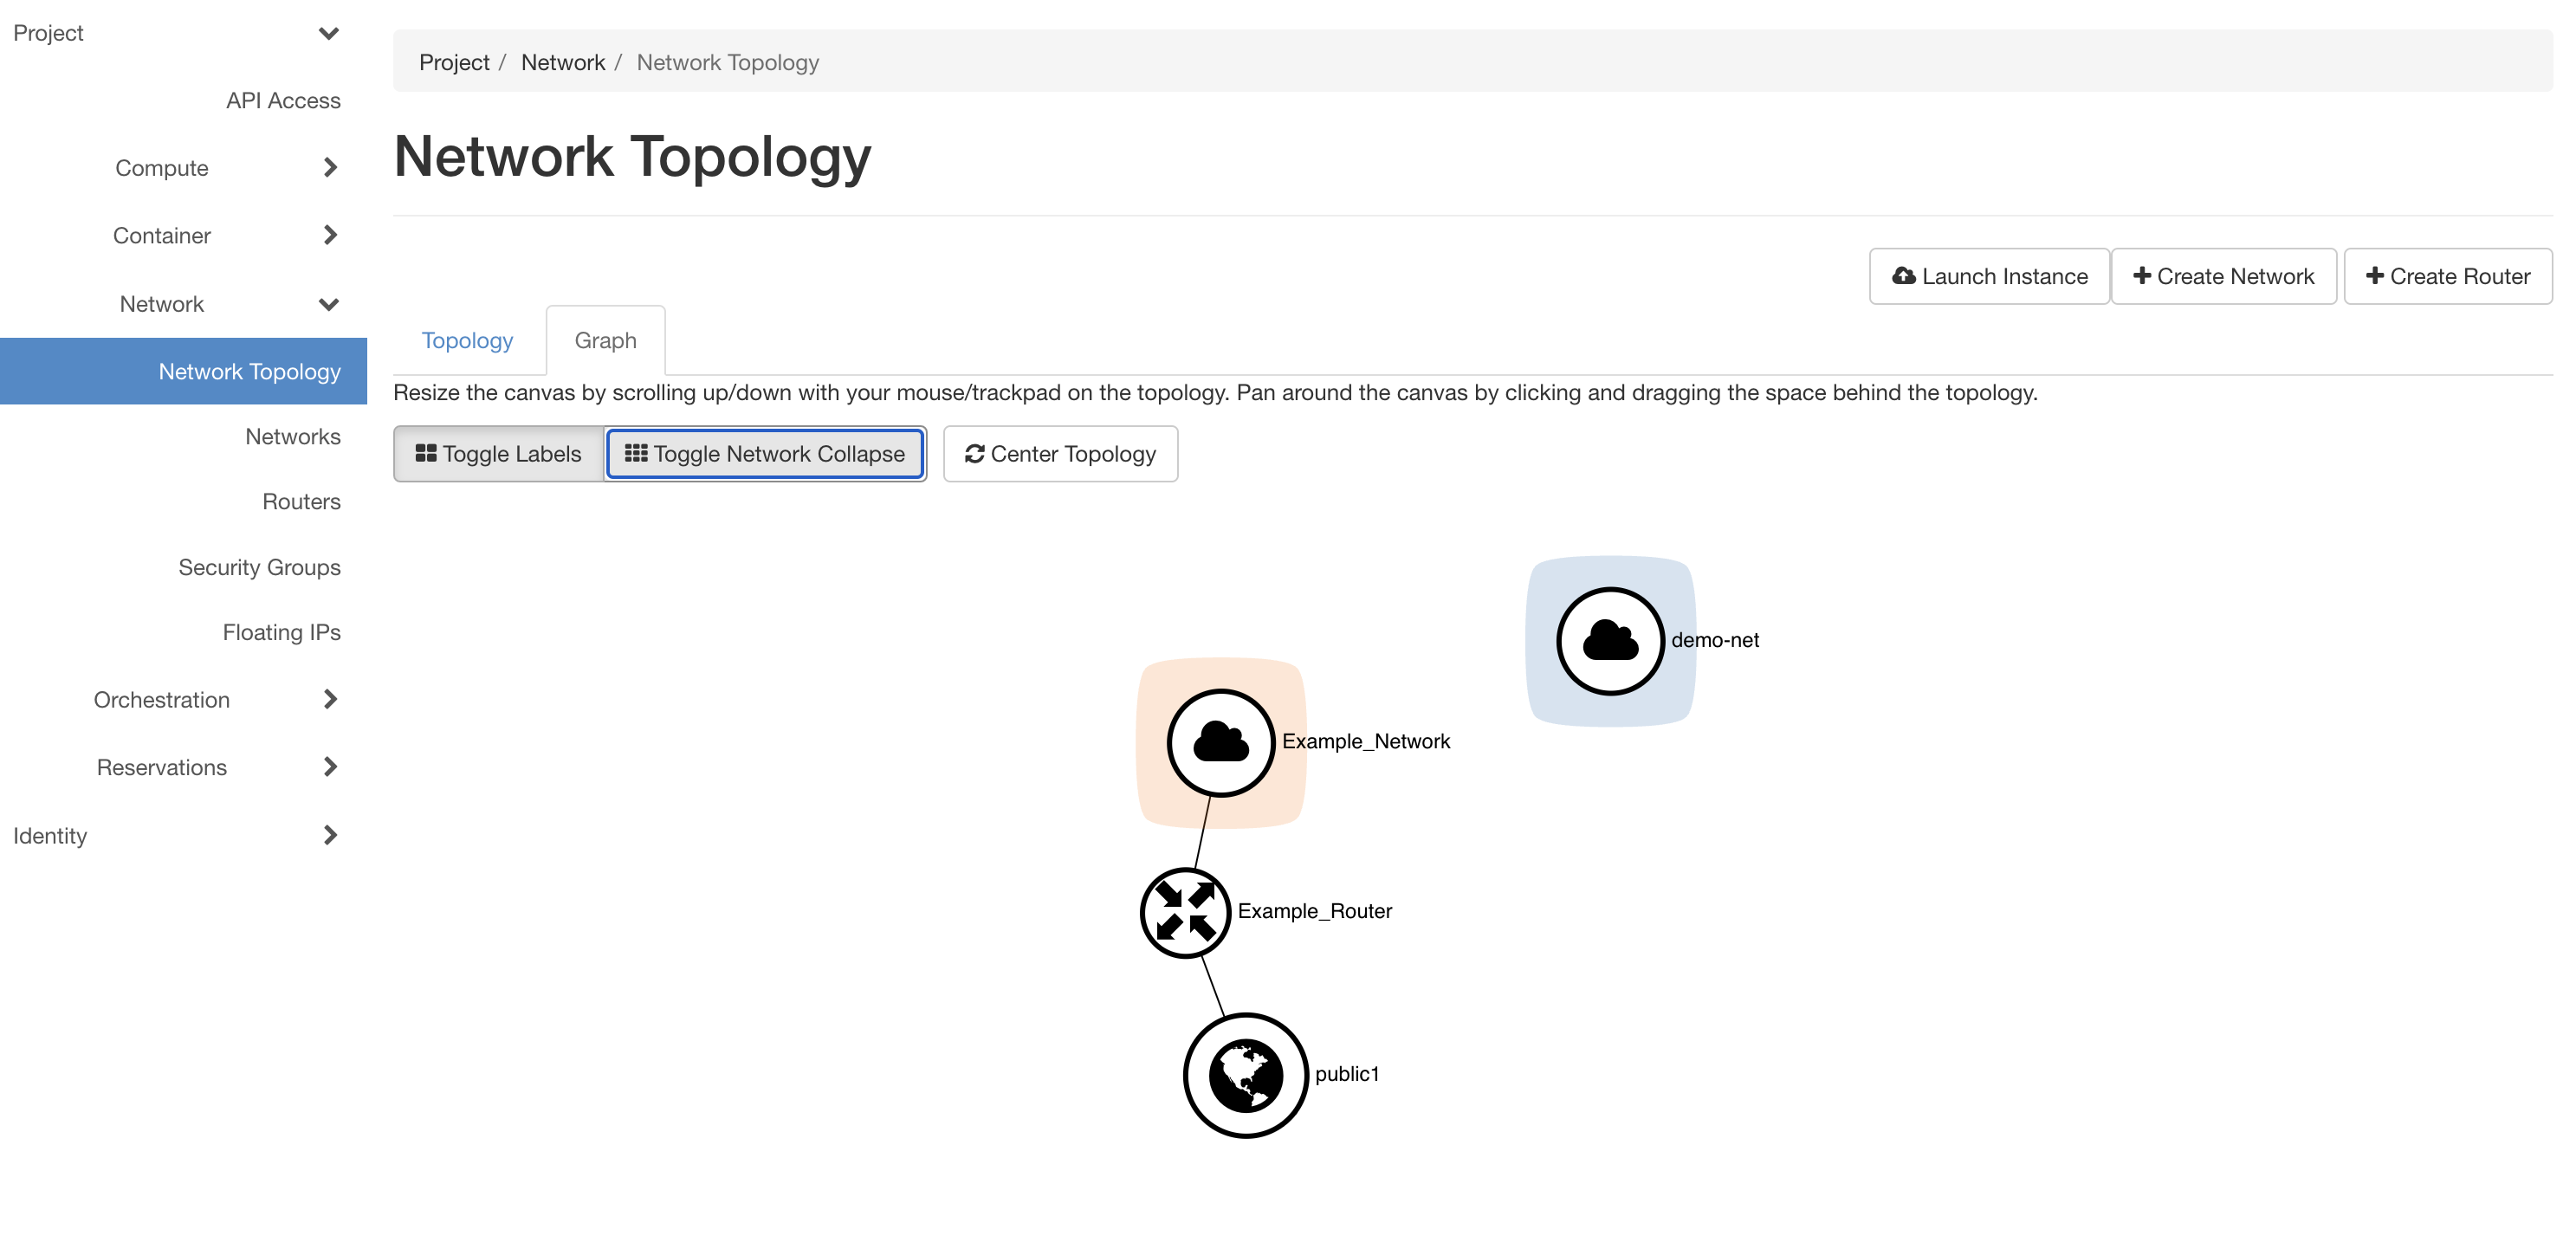
Upon creation, the router appears in the network. Now the router should be attached to the virtual network by adding an interface to the router. For the same, select the router from the list of routers in Project -> Network -> Routers. Select the Interfaces menu in the page as shown in the figure below:

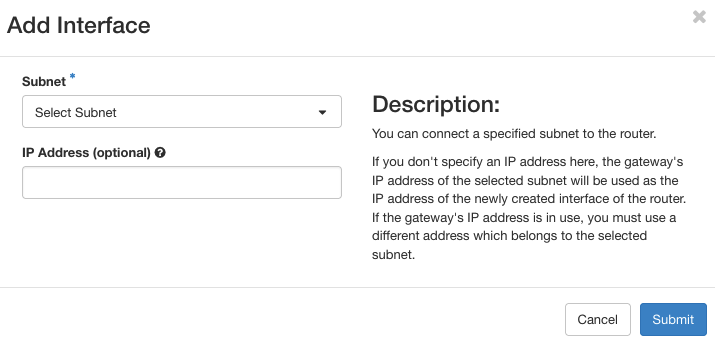
Click on the Add Interface button on the top-right of the page which pops up the following form. In the subnet drop-down box, select the virtual network to connect to the router. If need be, an IP address can be assigned to the interface instead of a default one from the virtual network. On interface activation, a link from the router to the virtual network will be visible in the network topology.
Deleting a Router: In order to delete a router, first we need to delete the interfaces connected to it. For the same, go to the Router page via Project -> Network -> Routers and click on the router you want to delete. From the router description page, click the Interface tab as shown in the figure below:
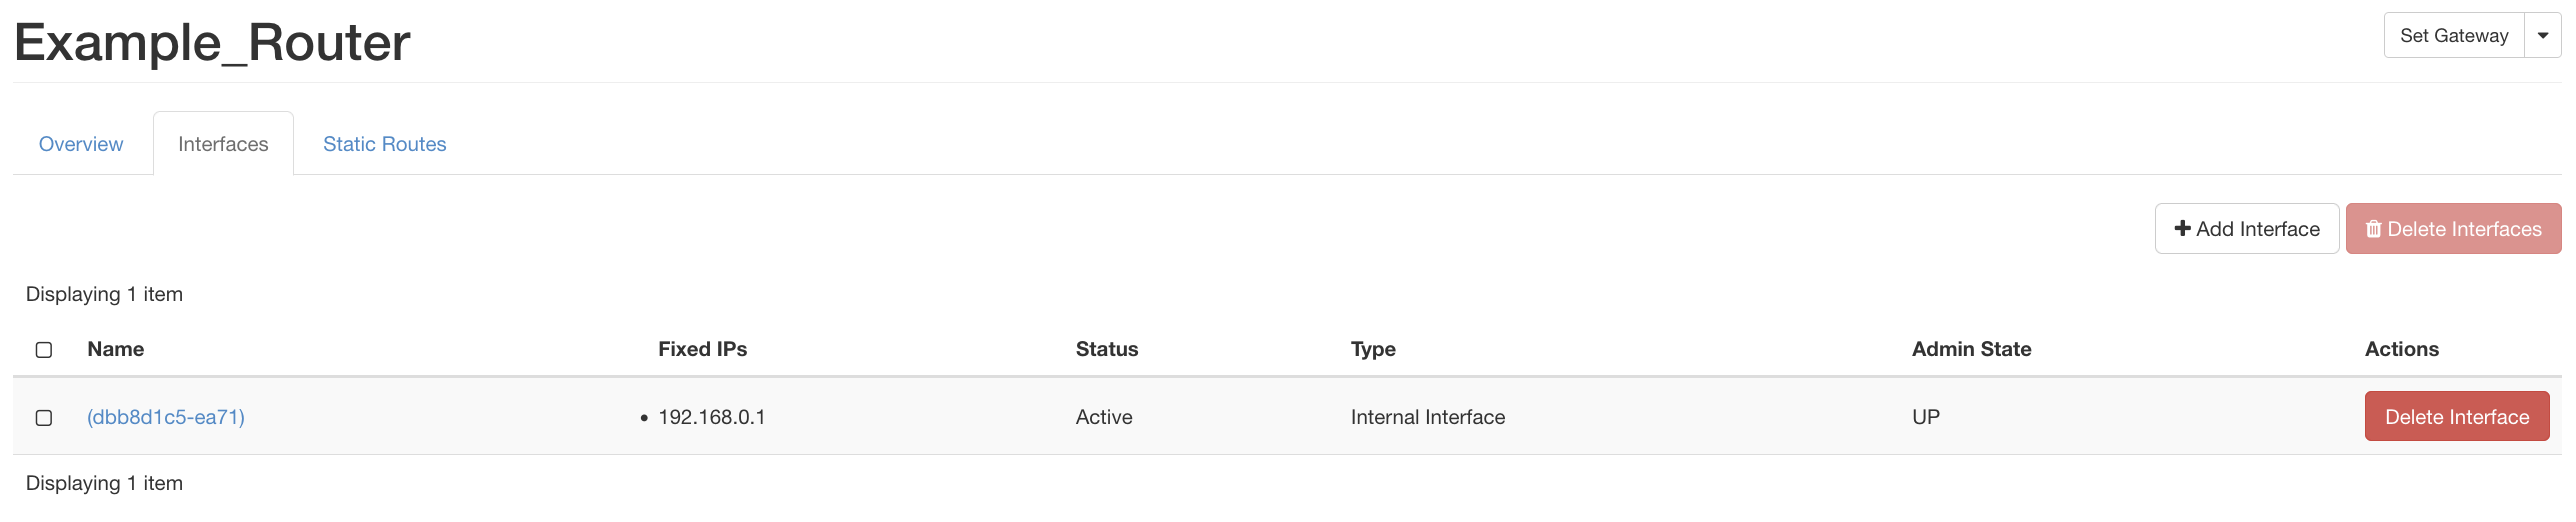
Click on the Delete button at the right to detach and remove the interface form the router. Once you remove all interfaces, come back to the Project -> Network -> Routers page select the Delete Router from the button at the right (in the Actions column).

Security Groups in ARA Portal
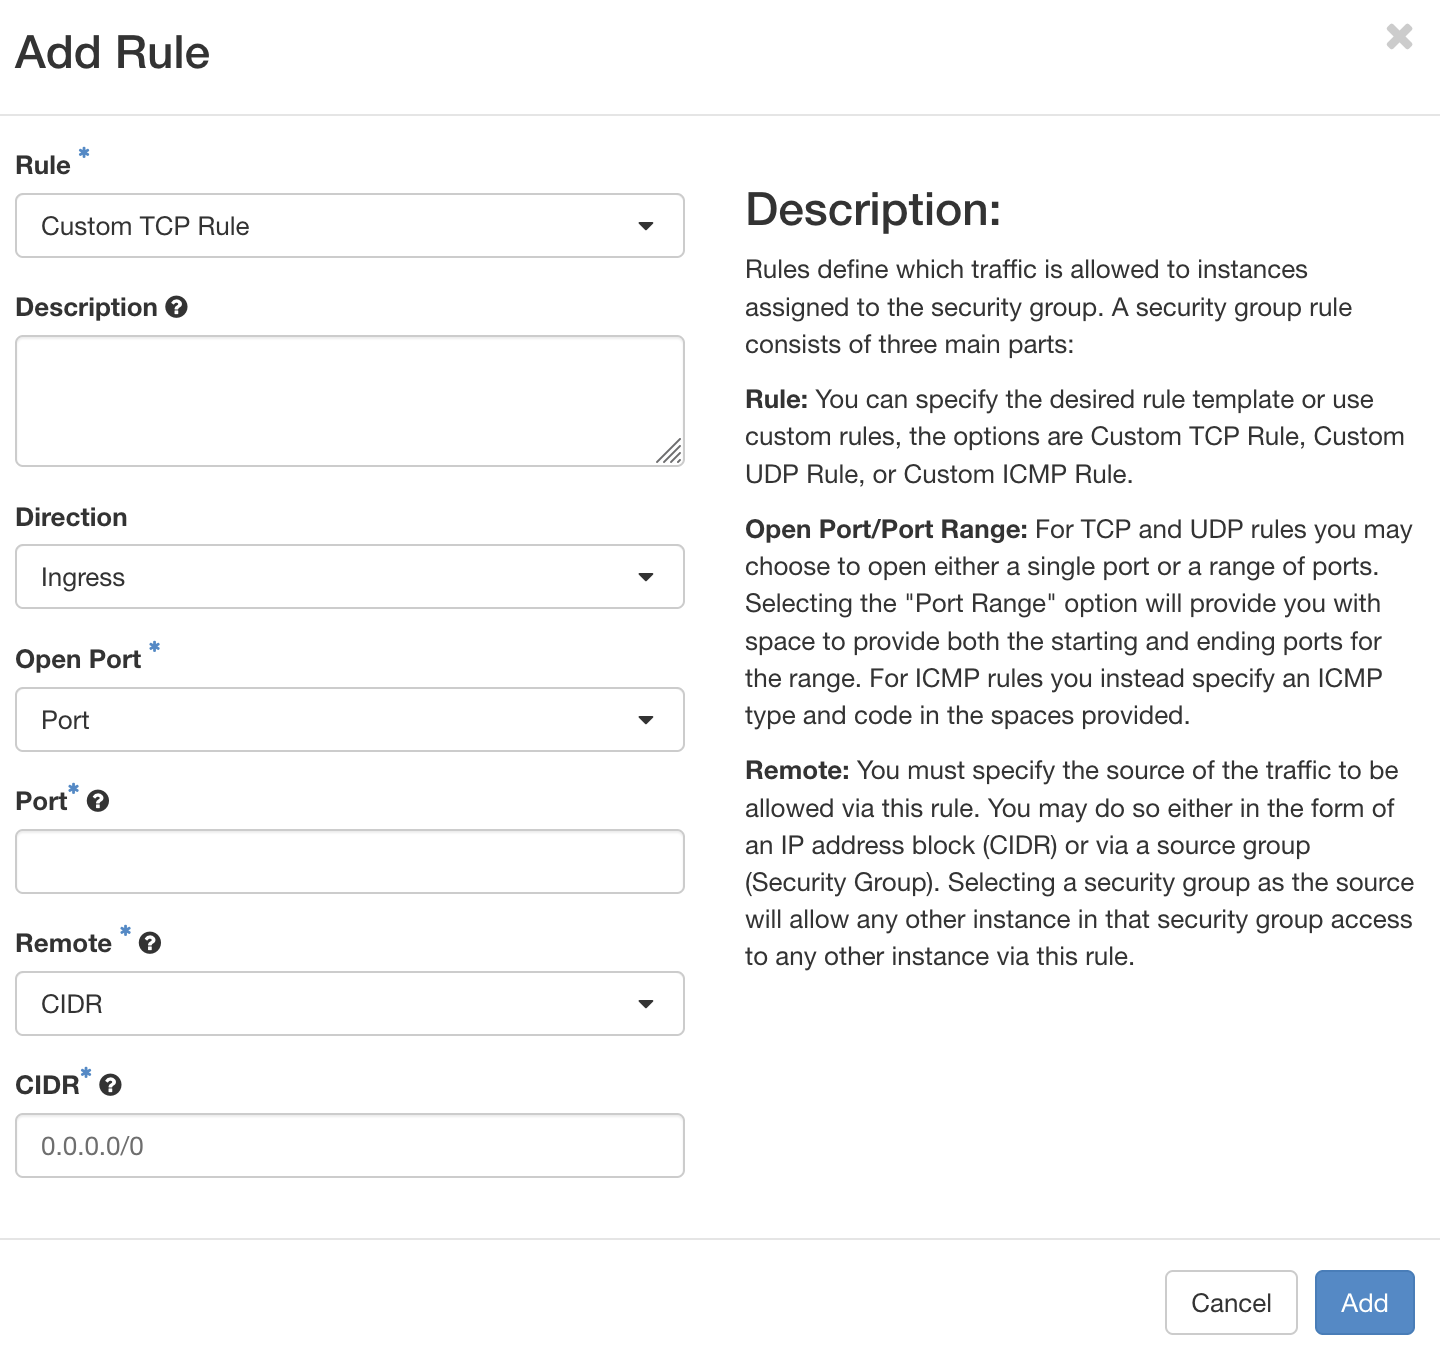
Security groups provide options for users of the project to filter the traffic to/from the containers associated with the project. Security groups can be accessed via the Project -> Network -> Security Groups tab. There exists a default security group for each project with rules for managing the traffic. Users can create custom security groups by clicking Create Security Group button on the top-right. In each rule for a security group, we can specify the direction of traffic (ingress or egress), the IP version, specific protocol with associated port, and source/destination. In order to add a rule, first select a network from the list of groups by clicking the Manage Rules button associated with the security group. Further, click on the Add Rule button on the top-right. In the form, add the rule with above-mentioned attributes.
ARA Jumpbox
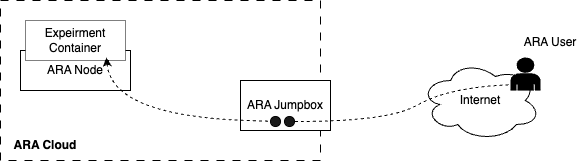
ARA Jumpbox is a mechanism provided for users to access containers via SSH from their personal machine in a 2-hop fashion, i.e., users can SSH to jumpbox and then to their respective containers using the floating IP as shown here. A diagram representing container access via jumpbox is provided below.
Access to jumpbox is restricted only via key-based authentication. Once a user is registered with the ARA portal, ARA Team send the user an email with confirmation on the ARA account.
Generating and Uploading the Public Key
For generating the key-pair for SSH access, users can run the following command in the Command Shell (in Microsoft Windows) or Terminal (in Unix/Linux/Mac systems).
ssh-keygen
The command creates a private key (for example, id_rsa) and a public key (for example, id_rsa.pub). User can upload the public key via the key-upload form which can be accessed using the Upload Public Key option provided on the user icon with username on the top right as shown in the figure below:

Clicking on the Upload Public Key leads you to the page as shown below.

First you can click on the button Browse and select your public key (say id_rsa.pub). Upon selecting the file, you can click on the Upload Key button on the bottom right. Please note that it may take a few seconds to update the key.
In the page for uploading the public key, you can see your jumpbox username (as shown in the blue rectangle) below the Description section. You need to use this username to SSH into the ARA jumpbox from your system with the command provided in the description. An example is provided below.
ssh -i your_private_key_filename jumpbox_username@jbox.arawireless.org
Note
You can update your ARA jumpbox public key anytime using this form. Once you upload a new key, the old key becomes invalid.
Once login to the jumpbox, users can login to their respective containers using the container username and password. For login to the container via SSH, it is important to ensure that the package openssh-server is installed and the SSH service is running in the container. For installation of SSH server for Debian/Ubuntu based containers, use the following commands in the container via the console. In most cases, the SSH will be installed by default in the experiment containers provided by ARA.
# apt update
# apt install openssh-server
# service ssh start
Login to the container in root user
By default, containers are launched with root user. However, SSH does not allow root login by default. For enabling root login, use the following steps in the container via the ARA portal. In most cases, this is already enabled in containers and you can skip this step.
# apt install nano
# nano /etc/ssh/sshd_config
The file will be opened in the terminal and uncomment the line PermitRootLogin prohibit-password and change it to PermitRootLogin yes. Then save and exit the file using Ctrl+X.
Restart the SSH service with the following command. Please not that it is mandatory to execute this command.
# service ssh restart
Further set password for the root user using the command
# passwd
Then, we can login to the container from the ARA jumpbox via the following command.
# ssh root@floating_ip_of_container
The floating IP of the container can be found from the container information page. A snapshot depicting the floating IP (shown in blue rectangle) as shown below:

Login to the container in non-root user
For accessing the container in non-root mode, create another user, say johndoe, in the container and set password using the following commands.
# useradd -s /usr/bin/bash johndoe
# passwd johndoe
For login to the container with the account johndoe, use the following command.
# ssh johndoe@floating_ip_of_container
Tip
If you face any issue with ping/SSH to the container from ARA jumpbox, refer FAQ.
Experiment Data Collection
Each experiment in ARA generates data, which can be analyzed in the
container itself or can be copied to the user’s machine. For copying
the data from the containers, user can use the scp command twice,
via the jumpbox. Assume the user experiment generated a folder named
result (in the /root folder) in the container with the
experiment data. For copying the data from the container, use the
following steps:
In the ARA jumpbox run the command. Assume, the current working
directory of jumpbox is /opt/johndoe.
# scp -r root@floating_ip:/root/result .
In the user machine, run the following command to copy the folder from jumpbox to the user machine.
# scp -i private_key_filename -r johndoe@jbox.arawireless.org:/opt/johndoe/result .
Note
Once the data is copied to the user’s personal computer,
delete the files from the jumpbox to avoid storage
overflow. In the above example, the directory can be
removed from the jumpbox by running the command rm -rf
/opt/johndoe/result in the jumpbox shell.
ARA User Management
As mentioned in Joining a Project section, ARA has two types of users: (1) Project Administrator and (2) Project Member. In ARA, a project administrator has the rights to creating and adding users to the project. For user management, navigate to Identity -> Users tab in the dashboard. In the page, existing users of the project will be listed. For creating a user, click on the Create User button on the top-right portion of the page which pops-up the user-registration form as follows:
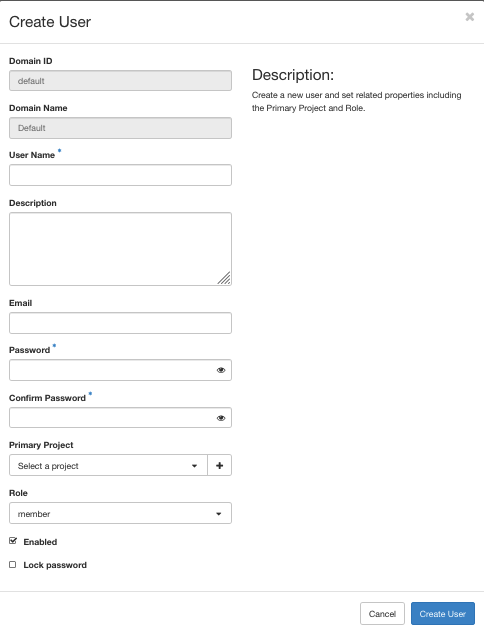
In the form, the fields Domain ID and Domain Name were automatically filled from the project environment. For the remaining field consider the following options:
Username: Describe the user identity for login. There are two options for usernames
For federated login: Add username as the Email ID of the user.
For keystone-based login: Add a valid username.
Description: Any additional information of the user.
Email: An optional field to provide Email ID of the user.
Password: Provide a random strong password for the user. Please note that providing password is mandatory to add a user, in both federated and keystone-based login cases. The password should contain at least 8 characters containing at least two uppercase letters, lowercase letters, numbers, and special characters.
Primary Project: Select the project for the user to be added, especially if the project administrator is managing multiple projects.
Role: The role for the user. Assign the role member from the drop-down list for a project member. In fact, the project administrator can assign admin role to the user if the user needs to play Project Administrator for the project.
Keep the box Enabled for enabling the user.
Further, click on the Create User button to create the user account so that users can login to the ARA portal.
Adding Users from a List
If you want to add a list of users in a single click, navigate to the Identity -> Users tab in the dashboard. Then, click the Create User List button in the top-right corner of the page to open the following form:

The fields Domain ID and Domain Name are automatically populated. The drop-down menu under Primary Project lists the projects where you have an admin role. From the list, select the project to which you want to add users. Next, click the Choose File button to upload a CSV file containing user information in the following format:
username
test11@email.com
test12@email.com
Once the file has been selected, click Create Users button to create the users.