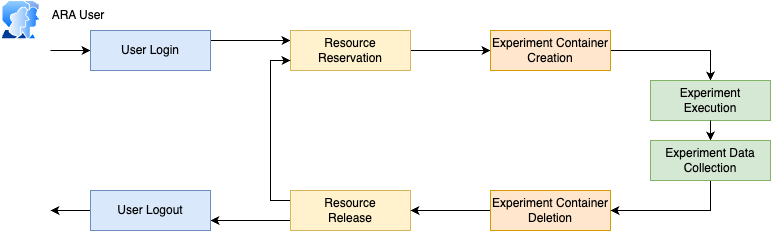
ARA provides a cloud platform consisting of wireless and computing
resources for researchers to carry out advanced wireless
research. Users can login to the platform with credentials and reserve
the required resources for specific period of time for executing their
wireless experiments. A general workflow of an ARA experiment is shown
in the figure below:
The experiment workflow starts with user authentication which allows
users to enter the ARA software platform to access the
resources. Further, user can check the available resources and reserve
the required resources for the experiment for a specified duration of
time. Since ARA provides a container-based resource provisioning,
users need to create and launch containers on the reserved
resources. On launching containers, users can run the experiments in
the respective containers. Completing the experiment, users can
collect/copy the experiment-related data from container as described
in Experiment Data Collection. Further, the containers can be
stopped and deleted from the reserved resource. Further, the reserved
resources can be released so that they can be added to the free
resource pool.
ARA Portal is the primary interface for users to login to ARA
environment and explore the resources. Different components of the
web-portal are described below.
Attention
For better experience with the ARA portal, use Google
Chrome (or any derivatives of Chrome) or
Mozilla Firefox browser.
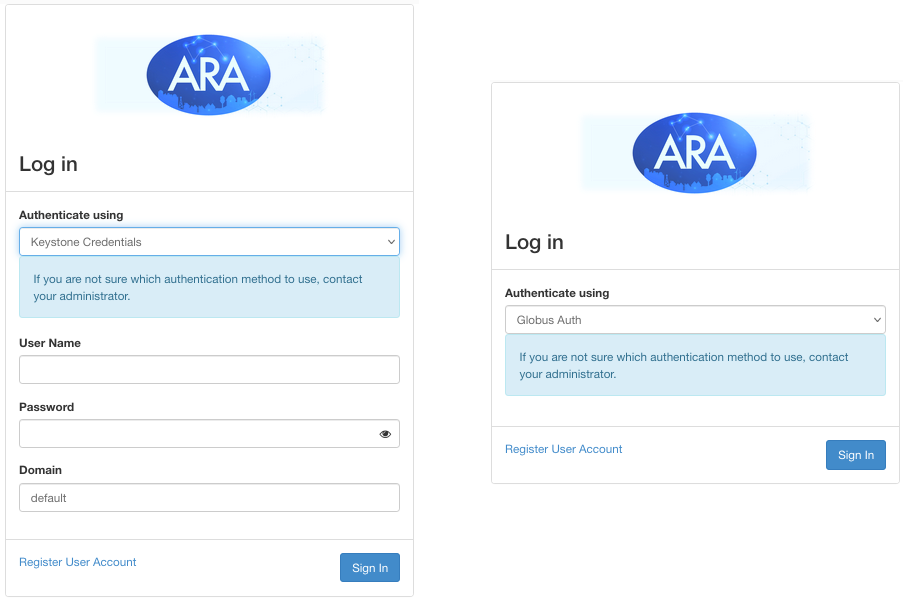
The first step for any user for entering the ARA platform is to
authenticate using the appropriate credentials, i.e., username and
password. Since the primary interface for ARA platform is the
web-portal, users need to visit the ARA Portal where they can see
the login page with options to provide username and password. ARA
Portal enables two methods of authentication: (1) using Globus Auth
Single Signon system and (2) using Keystone credentials, i.e.,
username and password. For Globus Auth-based authentication, a user
can login to the ARA platform using their institutional email ID given
the institution is listed in GlobusAuth. A snapshot of the ARA login
screen is shown below.
In case of GlobusAuth, select your organization from the drop-down
list and continue with the authentication procedure. In case if your
organization is not listed, you can either use Sign in with Google
or Sign in with ORCID ID option.
On login, the user will be taken to an overview page consisting of a
dashboard and a description of the usage of available resources as
shown below. Each resource is associated with a host computer and the
related wireless radios. For example, the user equipment consists of
an SDR, Skylark CPE, or COTS (Quectel) radio. The status Available
under Reservable column indicates the corresponding device is
healthy and can be used for experiments. For reserving the node, the
user should visit the ARA Resource
Calendar and check the resource
availability. On the other hand, the status Unavailable represents
the device is busy or under maintenance/testing.
The dashboard primarily consists of three menus: (1) Project, (2)
Admin (for project administrators), and (3) Identity.
The Project menu offers users options to explore ARA resources such
as compute nodes, storage nodes, base stations, and user
equipment. For managing the resources, Project menu provides three
sub-menus for Compute, Container, Network, and
Reservations.
Compute: The Compute sub-menu provide information on the usage
of ARA resources including compute instances, CPU usage, memory
usage, network resource (such as floating point IPs) usage.
Containers: The sub-menu is provided for containerized resource
management. That is, users can create containers on reserved
resources, access the container console, execute experiments, stop
containers, and delete the containers. The page corresponding to
the Containers tab lists the existing containers from where users
can view containers’ information and manage them.
Network: The Network sub-menu is intended at managing the
network resources. The Network Topology tab provides a graphical
view of existing networks in the project. The Networks tab allows
users to create a new network for the project so that the compute
resources can communicate each other through the network. The
Routers tab allows users to create virtual routers that can
connect different networks in the project. The Floating IPs tab
enables users to associate external IP, i.e., other than the
default IP from the connected virtual network, to their compute
resources (containers) so that the compute resources can be
accessed from the jump-box node.
Reservations: Before using any resource, users should reserve the
resource or a create a lease on the resource. The Lease tab under
reservations allow users to view the resources along with their
availability (through the host calendar) and create lease on the
required resource.
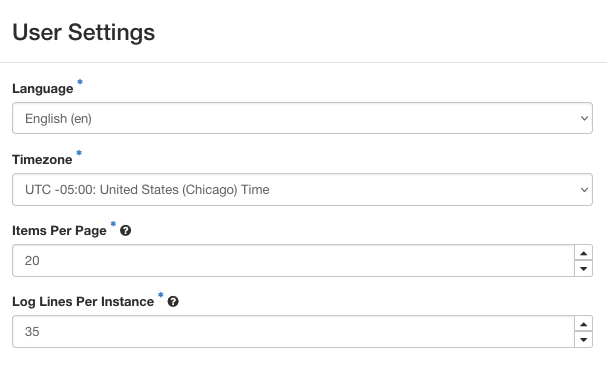
Since ARA is sensitive to time in scheduling the resources, it is
important for the users from different parts of the world to use time
in appropriate format. By default, ARA uses Coordinated Universal Time
(UTC) for managing the resources. However, users can specify time in
their own time zone while reserving the resources. Therefore, it is
advisable for users to change their time zone before starting to use
the platform. For setting the time zone use the following steps:
Click on the user icon with username on the top right.
In User Settings, change the Timezone to appropriate one and
save it.
As far as ARA users are concerned, it is important to select the
appropriate resources (from the ones specified in
ARA Resource Specification) for the experiments. Since ARA is a
multi-user platform, it is possible that the required resources may be
already reserved for other experiments. In this context, host calendar
feature of AraSoft provides a visual representation of the resource
availability so that users can reserve the resources accordingly. For
accessing the host calendar, navigate to the Project -> Leases page
and click on the Host Calendar button on the top right location.
On finding appropriate resource from the resource calendar, users need
to reserve or create a lease for the resource. The Lease tab under
the Reservations sub-menu helps user to create a lease for the
resource. While creating the lease users should provide a name as well
as the duration for the lease. Further, the specification of the
resource the user needs to be provided which includes the site where
the resource resides, type of the resource (RAN, backHaul, or
compute), and the device type such as base station, user equipment, or
compute node. An example for reserving a resource is provided in the
Hello World experiment.
Note
Apart from the resources accessible via portal, ARA deployed
nodes (e.g., mobile UEs such as phenobots and tractors), as
shown in the deployment map in
ARA Resource Specification, for enabling experiments
under different rural settings. At present, the nodes are
enabled for generating data related to wireless
measurements. Users interested in such datasets can submit
their interest and requirements via
support@arawireless.org. ARA team will evaluate the request
and work with the users to curate the data over time. For
selected mobile UEs (such as the UE deployed on the vehicles
of transportation services), we enable the access via ARA
portal once they have predictable routes sufficient to
enable meaningful experiments.
Users focused on agriculture applications can contact the
ARA team at ag@arawireless.org to share their interest and
requirements.
ARA follows containerized resource provisioning approach and the
reserved resources can be accessed via containers. In other words, ARA
enables the users to launch containers on the reserved nodes, thereby
providing access to the resources including the wireless radios. On
launching a container, users are provided access to the resources via
the console from the web-interface or through SSH via the jump-box. An
example for launching a container on the reserved resource is provided
in the Hello World experiment.
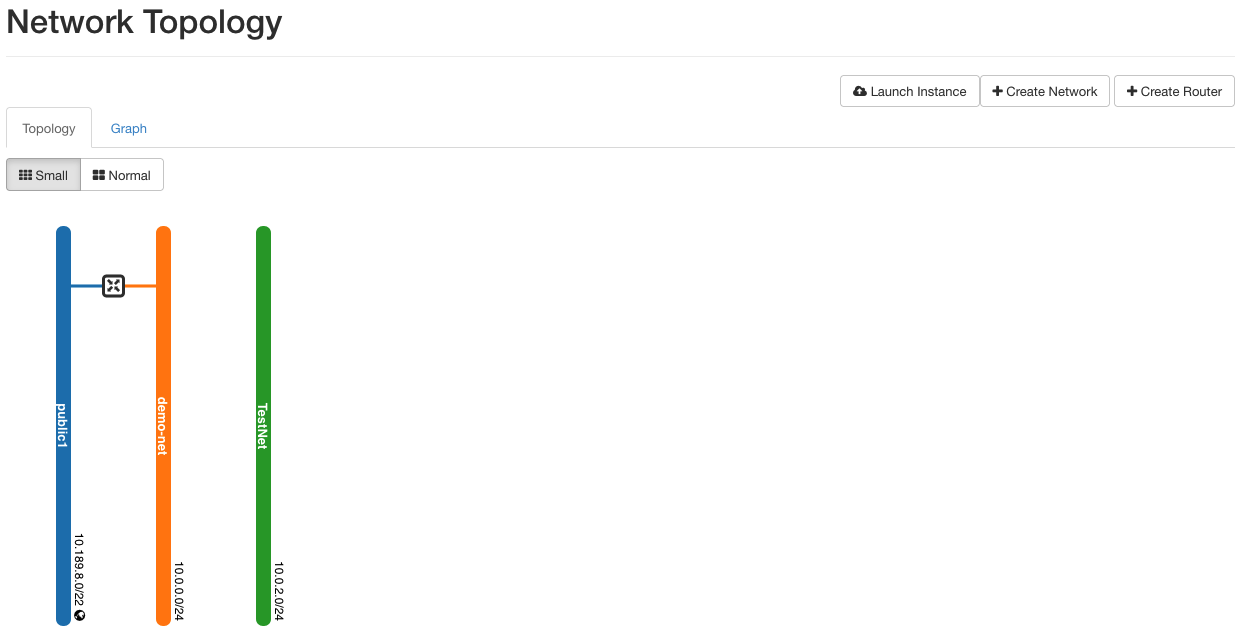
In ARA Portal, the network environment for experiments can be accessed
via the Network menu in the Project tab of the dashboard. For ARA
users, we provide a shared network, named public1 in the figure
below, which maps to a physical network. The shared network acts as an
interface for containers to access the Internet, however, via a
virtual network. The ARA portal offers options for users to create
virtual networks for their experiments. The virtual networks can be
tied to the containers during the container creation phase and the
containers attached to the same network can communicate each other via
the virtual network. The following figure shows the network
environment for ARA experiments.
By default, a container can access only the virtual network (such as
demo-net or TestNet in the above figure) it is attached to. The
demo-net is a shared virtual network provided by ARA for users
while TestNet is a virtual network created for the project. For
containers to access Internet, the virtual network should be connected
to the physical network (public1) using a router. Similar to the
options for creating virtual networks, ARA portal has provisions to
create virtual routers (Project -> Network -> Routers) that can
connect multiple virtual networks together or between virtual network
and the physical network. Detailed information on ARA network
management can be found in ARA Networking.