AraOptical (FSOC) Link Latency and Throughput Measurement
Resources needed: AraOptical link and AraHaul host servers.
Detailed Description: The experiment allows users to measure the
latency and throughput of the AraOptical link. The experiment setup is
illustrated below.
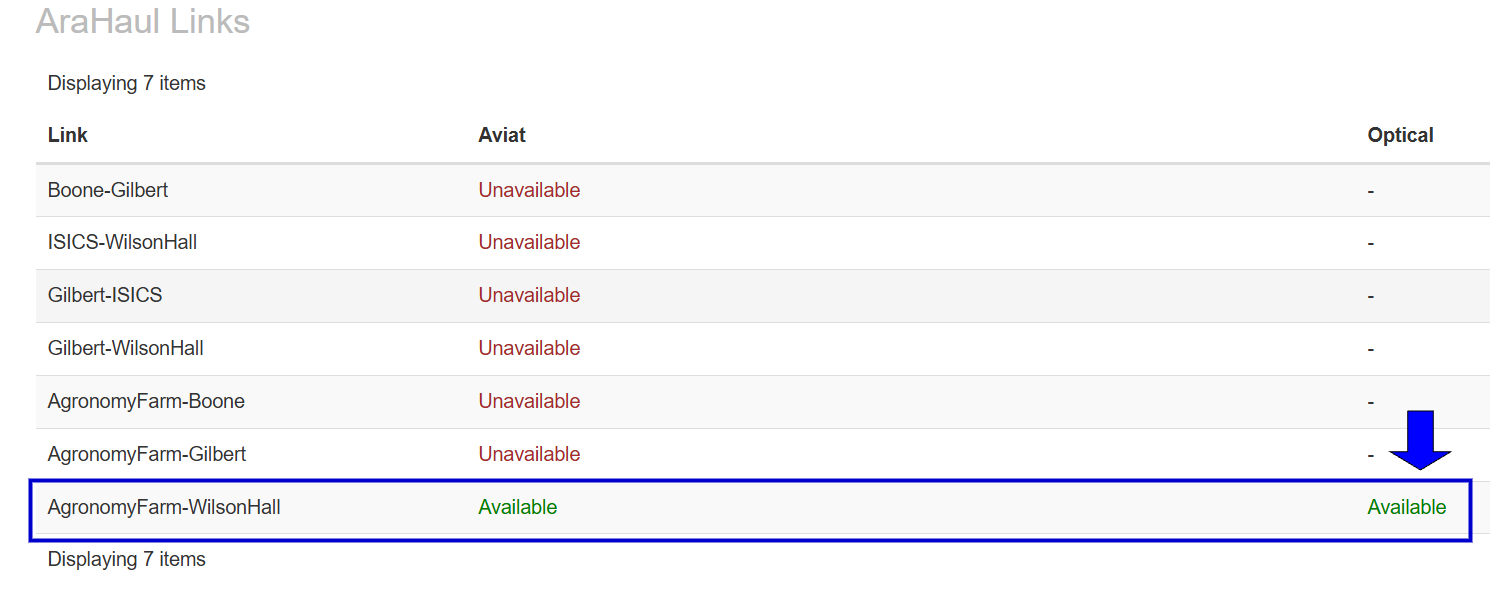
Before proceeding with the experiment, ensure that the AraOptical link
between Wilson Hall and Agronomy Farm is shown as Available in the
Resource Overview page (under the AraHaul Links section, in the
Optical column) in the ARA Portal as indicated below.
Once the container is launched, a floating IP will automatically
associated with each container. The floating IP allows you to
access the container remotely through SSH via ARA jumpbox. Visit
ARA Jumpbox for more information on accessing containers via
jumpbox.
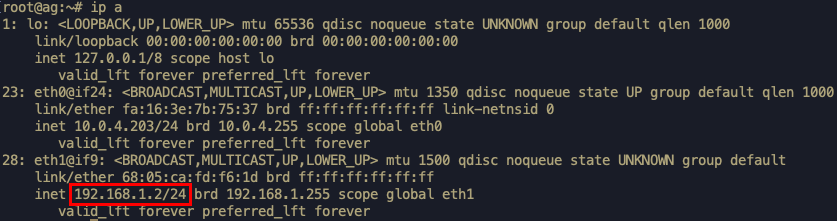
On login to the Wilson Hall and Agronomy Farm containers, check the
local IP addresses of both, which are used in the experiment to
perform the latency testing. Run the following command for checking
container IP in both containers.
# ip addr
Note the IP address of the form 192.168.1.X in both
containers. An example is shown below.
Latency Measurement
6. In this experiment, we measure the latency, i.e., the
Round-Trip-Time (RTT), over the FSOC link using the ping
utility.
Note
For this experiment, we assume the IP address of
AraOptical container at Wilson Hall is 192.168.1.128 and
that of Agronomy Farm is 192.168.1.2.
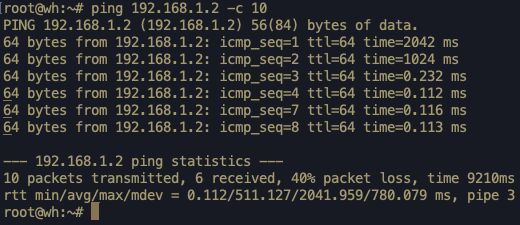
For measuring the RTT from Wilson Hall to Agronomy Farm, execute
the following command at Wilson Hall container.
# ping 192.168.1.2 -c 10
The command above sends only 10 packets (specified in the -c
option) to measure the delay. However, at times, the link may be
unstable and may not provide enough ping responses. In such cases,
you can change it to a larger number. An example output from Wilson
Hall container is shown below.
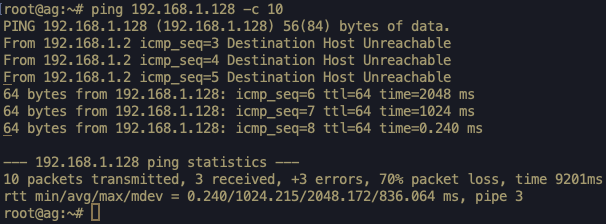
For measuring the RTT from Agronomy Farm to Wilson Hall, execute
the following command at the Agronomy Farm container.
# ping 192.168.1.128 -c 10
TCP Throughput Measurement
For the throughput measurements, we use the tool iPerf over the
FSOC link. For measurement, we need to set one container as the
iPerf server and the other as the iPerf client. In the example
below, we run the iPerf server Agronomy Farm container and the
iPerf client at Wilson Hall.
Run the following at the Agronomy Farm container to start iPerf
server.
# iperf3 -s
The iPerf server start as follows:
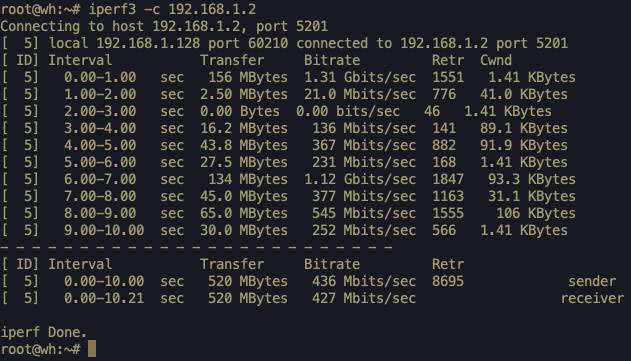
For measuring the TCP throughput from Wilson Hall to Agronomy
Farm, run the iPerf client at Wilson Hall container as
follows.
# iperf3 -c 192.168.1.2
A snapshot of the iPerf output at Agronomy Farm is shown below.
At the same time, you can see similar output at the the iPerf
server at Wilson Hall as follows:
Note
If you face any error in the iPerf server side, please
check the AraHaul FAQ.
UDP Throughput Measurement
For measuring UDP, we do the same procedure as TCP. However, in the
client, we need to enable the UDP option.
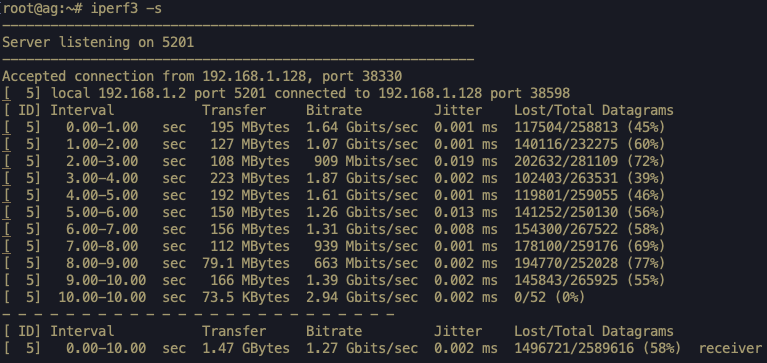
Start the iPerf server at the Agronomy Farm container as
follows.
# iperf3 -s
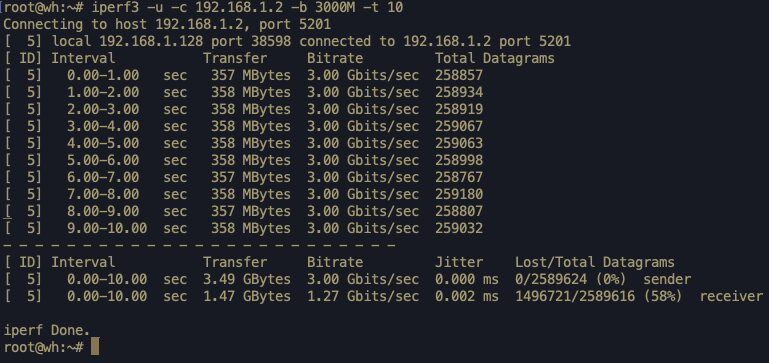
Start the iPerf client at the Wilson Hall container using the
following command.
# iperf3 -u -c 192.168.1.2 -b 3000M -t 10
The above command measures the UDP throughput (using the -u option)
for 10 seconds and produce the output as follows.
At the same time, the UDP server at Agronomy Farm generates the
corresponding output as follows:
If you want to save the log of the iPerf result, use the
following command.
# iperf3 -c 192.168.1.2 > throughput.txt
Here a file throughput.txt will be created. The file can be
listed and content can be printed using the following commands.:
# ls# cat throughput.txt
The file throughput.txt can be copied to your PC via the ARA
jumpbox as per the instructions provided here.
Tip
If you want to perform weather measurements along with the
RAN experiments, refer to ARA Weather APIs.