Measuring OneWeb and Starlink Satellite Link Characteristics
Short Description: Accessing OneWeb and Starlink satellite links.
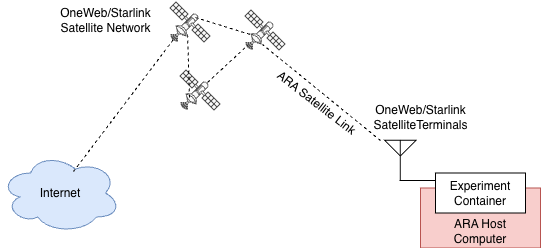
Detailed Description: The experiment allows you to access the OneWeb and Starlink satellite links from an experiment container. Additionally, you can measure the latency of each link. The experimental setup is illustrated in the following figure.
Detailed Steps for the Experiment
Login to ARA portal with your credentials.
Note
If you are a first time user, it is highly recommended to run the Hello World experiment first to get familiarized with the interface and portal.
Create a reservation using the Project -> Reservations -> Leases tab from the dashboard.
Site: Wilson Hall
Resource Type: AraHaul
Device Type: Host
Device ID: 000
Create one or more containers from the Project -> Container -> Containers tab from the dashboard by clicking the Create Container button on the top-right. Containers can be created depending on the following three choices, i.e., you can have a container with a specific link or a container attached to both links.
Container images Choice of Access
Container Image
Only OneWeb
arawirelesshub/ara-satellite:onewebOnly Starlink
arawirelesshub/ara-satellite:starlinkBoth OneWeb and Starlink
arawirelesshub/ara-satellite:allFor other fields, you can provide the values below.
Name: Select a name for your container
Command: bash
Lease Name: Provide the name of the lease you create in Step 2.
Networks: ARA_Shared_Net (Click the ↑ button to select the network)
Click on the Create button to create the container.
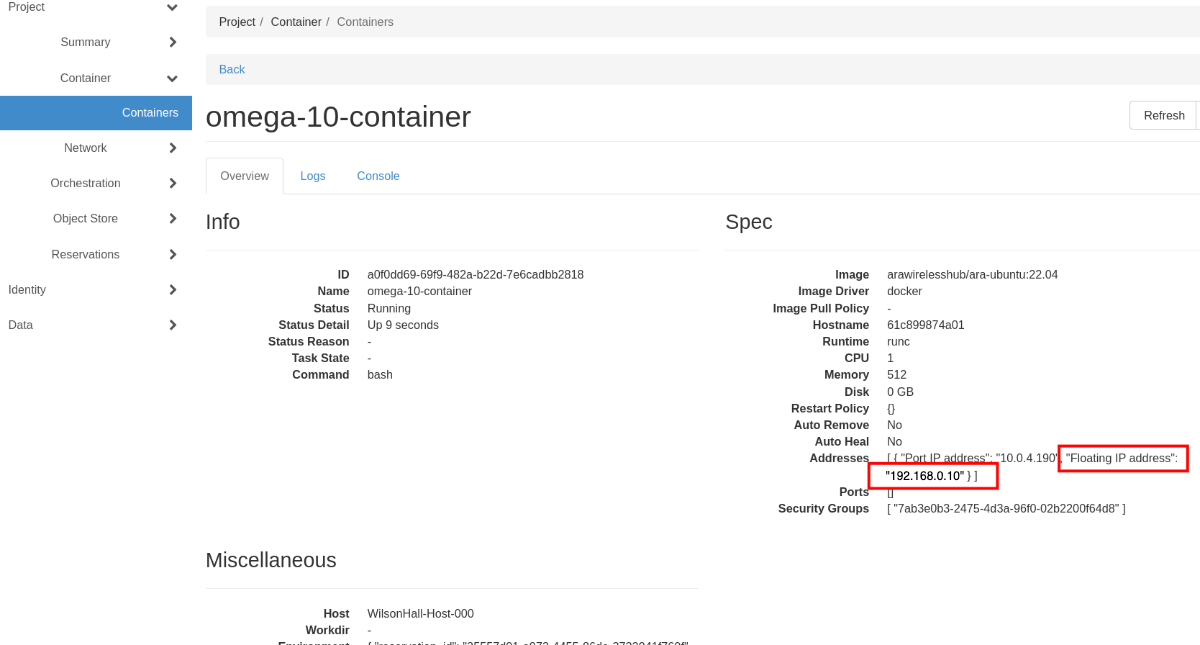
Select your container from the list of containers. The page provides the container information including name, status, and resource allocation as shown in the figure below. Take a note on the Floating IP Address of the container (marked in red rectangle in the figure below.)
Set up our container for the SSH access. From the Console tab of our container info page, access a web console. Start the SSH service using the following command.
# service ssh restartSet the password for the container using the command below.:
# passwordAccess the container using the floating IP address from ARA Jumpbox. You can visit ARA Jumpbox page for detailed procedures for accessing container from the jumpbox.
In the container, you will see the following interfaces and corresponding IP addresses.
Interface and IP addresses Choice of Access
Interface and IP Address
Only OneWeb
eth1: 192.168.42.X
Only Starlink
eth1: 10.3.X.X
Both OneWeb and Starlink
eth1: 10.3.X.X and eth2: 192.168.42.X
To communicate through a specific satellite link, you need to set appropriate route to the destination through the link’s gateway. For example, if you are using OneWeb link, you can create a route to 8.8.8.8 using the following command.
# route add 8.8.8.8 gw 192.168.42.1 dev eth1On the other hand, if you are using Starlink, use the gateway as 10.3.0.1 as follows.
# route add 8.8.8.8 gw 10.3.0.1 dev eth1Note
In the above commands, please note the interface name: if you are using OneWeb, the interface should correspond to the IP 192.168.42.X; if you are using Starlink, the interface should correspond to the IP 10.3.X.X.
For measuring the delay, run the following command from the container.
# ping -I eth1 8.8.8.8The above command sends packets through the specified link using the gateway set in the previous command.
Tip
If you want to perform weather measurements along with the satellite experiments, refer to ARA Weather APIs.
If you have any issues or questions, please reach out at support@arawireless.org.