OCUDU Prototyping with O-RAN Compliant nearRT-RIC and xApps
Platform: OCUDU software stack, nearRT-RIC (ORAN SC and FlexRIC), and Universal Software Radio Peripherals (USRPs).
Resources used: USRP NI N320 (Base Station), N320 host computer, Quectel RM5xxQ-GL (UE), Quectel host computer, power amplifiers, CommScope SS-65M-R2 Sector BS Antenna, and Quectel YEMN017AA Antenna.
Description: This experiment demonstrates an over-the-air 5G NR Radio Access Network (RAN) built with the OCUDU 5G software stack and monitored through an O-RAN compliant near-RT-RIC and xApps. Two RIC implementations are supported:
FlexRIC — a lightweight near-RT-RIC that runs as a native binary on the Base Station host. xApps are compiled native binaries.
ORAN SC RIC — the O-RAN Software Community near-RT-RIC deployed as a containerized stack via Docker Compose on the Base Station host.
OCUDU can also be deployed in two ways:
Monolithic gNB — the full gNB (CU + DU) runs as a single process.
OCU-ODU split — the gNB is disaggregated into an O-CU and an O-DU that connect over the F1 interface.
In all modes the RAN nodes expose an E2 agent that connects to the near-RT-RIC. A monitoring xApp subscribes to the E2 nodes through the RIC and collects per-UE downlink/uplink throughput Key Performance Metrics (KPMs) using the E2SM-KPM service model. The core network is deployed in the data center and reachable via the long-distance fiber backhaul.
Note
This experiment uses a COTS Quectel UE only. If you want to drive the OCUDU gNB with OpenAirInterface software nrUE (over a USRP B210) instead, see OCUDU with OpenAirInterface nrUE (Indoor/Sandbox and Outdoor).
This page covers both RIC choices and both RAN deployment modes. Use the tabs in Step 7 to select your near-RT-RIC, and the tabs in Step 8 to switch between the Monolithic gNB and the OCU-ODU split — every other step is identical for the two RAN modes.

Experiment Architecture: The OCUDU 5G RAN (monolithic gNB or OCU-ODU split) connects over the air to a COTS Quectel UE. Both the gNB/CU and the DU expose an E2 agent to the near-RT-RIC (FlexRIC or ORAN SC RIC), which relays KPM measurements to the monitoring xApp. The core network (Open5GS) is hosted in the ARA data center and reachable via the long-distance fiber backhaul.
Note
For OCUDU 5G experiments, an Open5GS core network is deployed at the data center and runs an iperf3 server in the background. Users do not have direct access to the core network, but they can run iperf3 and ping commands against it from the UE.
Detailed Steps for the Experiment
Login to ARA portal with your credentials.
Create two reservations using the Project -> Reservations -> Leases tab from the dashboard. Since each base station serves specific UEs in its footprint, reserve a matching Base Station and User Equipment pair. You may use any of the BS-UE combinations below.
Resource No.
Site
Resource Type
Device Type
Device ID
1
Gilbert
AraRAN
Base Station
000
2
Horticulture
AraRAN
User Equipment
000 or 001
3
Curtiss Farm
AraRAN
Base Station
000
4
Feedmill or Curtiss Farm
AraRAN
User Equipment
000
Create the containers on the respective nodes as provided in the following table. The Base Station container ships the complete OCUDU stack (
gnb,ocu, andodubinaries) together with FlexRIC and the xApps, so the same container image is used for both the monolithic and the OCU-ODU split deployments.Component/Reservation
Container Image
CPU
Memory
Network
Base Station
arawirelesshub/ocudu:complete_outdoor_v18
8192
ARA_Shared_Net
User Equipment
arawirelesshub/ocudu:cots_ue8
8192
ARA_Shared_Net
Once the containers are launched, take note of the floating IP if you want to access the containers from your PC via the ARA jumpbox. The containers can be accessed via the console tab of the respective containers in the Project -> Containers tab from the dashboard, or using SSH via the jumpbox server. Visit ARA Jumpbox for more information on accessing containers via the jumpbox.
Identifying and selecting the SDR: In the Base Station container, run the following command to list the radios (SDRs) connected to the host. In case the command cannot find an SDR, refer to the instructions in FAQ.
# uhd_find_devicesThe base station hosts multiple USRP N320 SDRs, each serving one sector. The command lists every detected SDR together with its
addr(IP address), as shown below.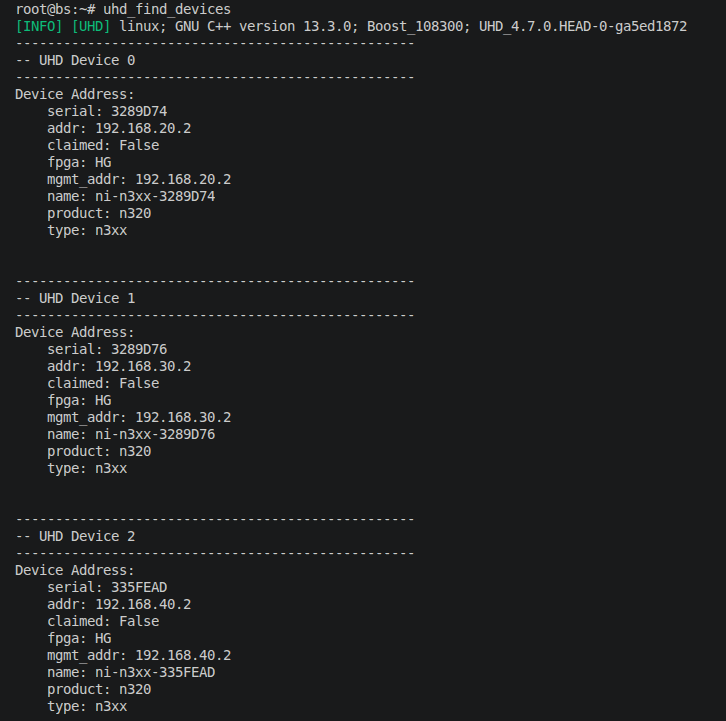
Select the SDR that serves the sector pointing toward your reserved UE, using the table below.
User Equipment
SDR IP Address
CurtissFarm-UE-000, Portable-UE-000, AgronomyFarm-UE-[001, 010], Gilbert-UE-003
192.168.20.2
Horticulture-UE-[000, 001]
192.168.30.2
FeedMill-UE-[000, 001]
192.168.40.2
For example, if you are using a Horticulture UE, the SDR IP address is 192.168.30.2.
Note this SDR IP address — you will write it into the RAN node’s YAML configuration file together with the AMF bind address in Step 6c.
Connecting the RAN to the core network: Before starting the gNB (or, in the split mode, the CU/DU), the RAN node must be able to reach the AMF of the data-center core network over the Base Station container’s core-facing interface. For most base stations this interface is
eth4. The Agronomy Farm BS is the exception — its core-facing interface iseth3.Important
In the steps below, replace
eth4witheth3only if your reserved base station is the Agronomy Farm BS. All other base stations useeth4as shown.6a. Note the eth4 IP address. Find the IP address of the
eth4interface of the Base Station container (useeth3instead if you are on the Agronomy Farm BS):# ifconfig eth4
For this experiment we assume the IP address of
eth4is 10.189.3.112.6b. Add the route to the core network and verify AMF reachability. The Base Station container ships an
add_route.shhelper that adds the static route to the core-network subnet. It takes your owneth4IP from Step 6a as its only argument, and adds the route. Continuing the Step 6a example whereeth4is10.189.3.112:# ~/add_route.sh 10.189.3.112
Important
The
10.189.3.112shown above is only an example — it matches theeth4IP assumed in Step 6a. Replace it with the actualeth4IP you obtained from your own container in Step 6a. The script computes the gateway from the IP you pass, so handing it the wrong IP will install a wrong route.Once the route is added, ping the AMF to confirm it is reachable:
# ping -I eth4 10.189.8.8
A successful ping confirms the RAN node can reach the AMF (
10.189.8.8). Stop the ping withCTRL+Conce a few replies are received.Note
If you ping the AMF before running
add_route.sh, the ping will fail because there is no path to the core-network subnet. Run the script with youreth4IP and ping again — the route must be in place for the N2/AMF connection (and therefore the gNB/CU) to come up successfully.6c. Configure the RAN node(s). Open the YAML configuration file for the mode you intend to run and update both settings in a single pass:
the SDR address — set
ru_sdr->device_args(theaddr=value) to the SDR IP from Step 5 (e.g.,192.168.30.2for a Horticulture UE).the N2/AMF bind address — set
cu_cp->amf->bind_addrto theeth4IP from Step 6a (e.g.,10.189.3.112).
In the monolithic deployment both settings live in the same file. In the OCU-ODU split they live in two different files — the O-DU drives the radio and the O-CU carries the N2/AMF connection:
Monolithic gNB — both settings in
~/ocudu/build/apps/gnb/gnb_n320_tdd_n78_40mhz.yamlOCU-ODU split —
SDR address in
~/ocudu/build/apps/du/du_n320_tdd_n78_40mhz.yamlBind address in
~/ocudu/build/apps/cu/cu_n320_tdd_n78_40mhz.yaml
For example, to edit the monolithic gNB configuration file:
# nano ~/ocudu/build/apps/gnb/gnb_n320_tdd_n78_40mhz.yaml
The SDR address and the bind address appear in the file as shown below — here the SDR is set to
192.168.30.2(Horticulture UE) and the bind address is set to theeth4IP10.189.3.112.

Note
The O-DU configuration file has no bind-address setting (the O-DU does not connect to the AMF) and the O-CU configuration file has no SDR setting (the O-CU does not drive the radio). In the OCU-ODU split you therefore touch each file exactly once.
Starting the near-RT-RIC — choose your RIC: The experiment supports two near-RT-RIC implementations. Select the tab below for the RIC you want to use. Keep the RIC running for the entire experiment; all subsequent components must be started in their own terminals of the Base Station container.
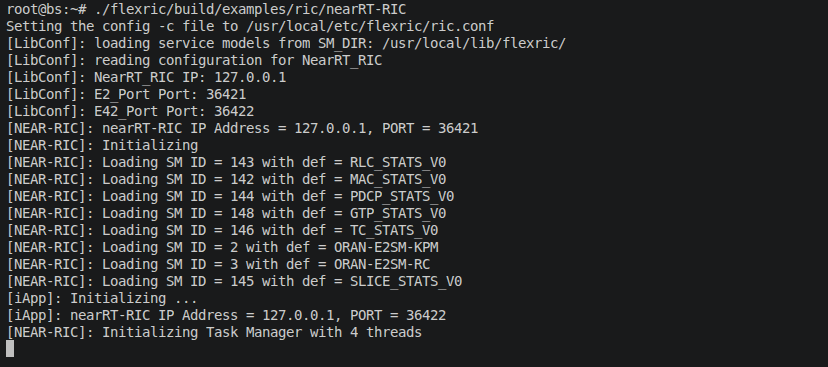
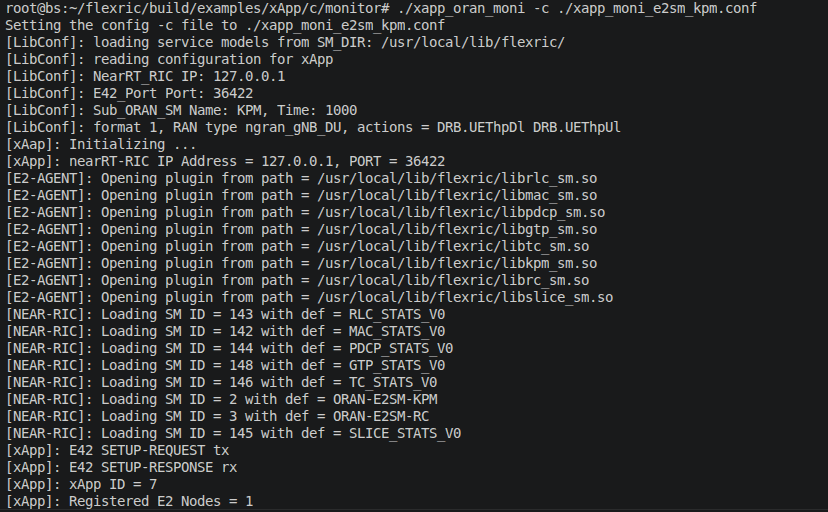
FlexRIC runs as a native binary on the Base Station container. It accepts E2 connections on
127.0.0.1:36421and serves xApps on127.0.0.1:36422.In a terminal of the Base Station container, start the near-RT-RIC:
# cd ~
# ./flexric/build/examples/ric/nearRT-RIC
On startup, the RIC loads its service models and waits for E2 nodes to connect, as shown below.
The ORAN SC near-RT-RIC is deployed as a containerized stack via Docker Compose. Before starting it, you must first load the required Docker images from the pre-packaged
.tarfiles in thedocker_imagesdirectory.7a. Load the Docker images. In a terminal of the Base Station container, navigate to the
docker_imagesdirectory and load each image:# cd ~/docker_images # for f in *.tar; do docker load -i "$f"; done
Wait for all images to finish loading before proceeding.
7b. Start the ORAN SC RIC with Docker Compose. From the same directory, bring up the RIC stack:
# cd ~/oran-sc-ric
# docker compose up
Docker Compose starts the RIC components (E2 Termination, Subscription Manager, Routing Manager, and the KPM xApp) and waits for the services to become healthy. When the stack is ready, the output looks as shown below.

Deploying the RAN — choose your mode: OCUDU can be deployed either as a monolithic gNB or as a disaggregated OCU-ODU split. Select the tab below for the mode you want to run. Every step after this one is identical for both modes.
Note
When starting the gNB, O-CU, or O-DU, append the
e2section flags on the command line to set the near-RT-RIC address and the local E2 bind address:FlexRIC (RIC runs on localhost):
e2 --addr="127.0.0.1" --bind_addr="127.0.0.1"ORAN SC RIC (RIC runs in another Docker):
e2 --addr="10.0.2.10" --bind_addr="10.0.2.1"
Replace the example addresses with the actual RIC IP and the desired local bind address in your deployment.
In the monolithic deployment, the complete gNB (CU + DU) runs as a single process and exposes one E2 agent to the near-RT-RIC.
8a. Start the monolithic gNB. In a new terminal of the Base Station container, run (substitute the E2 flags for your chosen RIC). Here we assume the gNB connects to the ORAN SC RIC:
# cd ~/ocudu/build/apps/gnb
# ./gnb -c gnb_n320_tdd_n78_40mhz.yaml e2 --addr="10.0.2.10" --bind_addr="10.0.2.1"
The gNB brings up the radio, connects to the AMF over the N2 interface, and connects to the near-RT-RIC over E2AP. When you see
==== gNB started ====, the gNB is ready.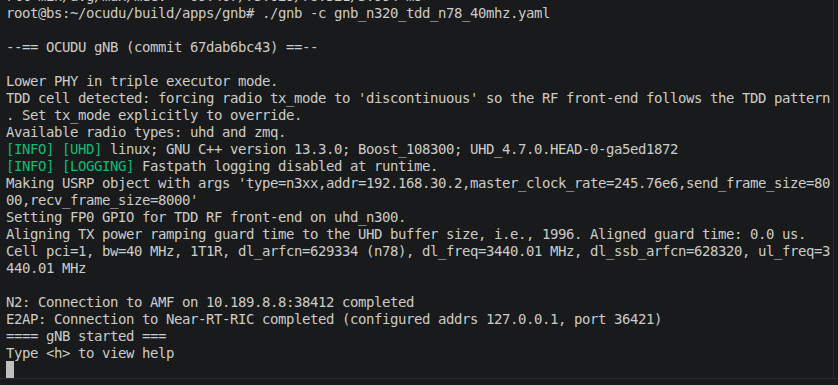
8b. Verify the RIC accepts the E2 setup. For FlexRIC, switch to the near-RT-RIC terminal. The RIC receives an E2 SETUP-REQUEST from the gNB and accepts its RAN functions (E2SM-KPM and E2SM-RC).

For the ORAN SC RIC, the E2 connection is visible in the gNB console log, as shown below.

The monolithic gNB registers with the RIC as a single E2 node (RAN type
ngran_gNB).In the OCU-ODU split deployment, the gNB is disaggregated into an O-CU and an O-DU that connect over the F1 interface. The CU connects to the AMF (N2) and the F1-C control plane listens on
127.0.10.1:38472. Both the CU and the DU expose their own E2 agent to the near-RT-RIC.Important
Always start the O-CU first, then the O-DU. The DU connects to the CU over F1, so the CU must already be listening.
8a. Start the O-CU. In a new terminal of the Base Station container, run (substitute the E2 flags for your chosen RIC). Here we assume the gNB connects to the ORAN SC RIC:
# cd ~/ocudu/build/apps/cu
# ./ocu -c cu_n320_tdd_n78_40mhz.yaml e2 --addr="10.0.2.10" --bind_addr="10.0.2.1"
The CU connects to the AMF (N2) and to the near-RT-RIC (E2AP), and begins listening for F1-C connections. When you see
==== CU started ====, the CU is ready.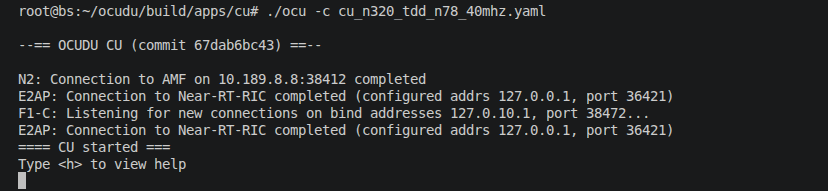
8b. Start the O-DU. In another new terminal of the Base Station container, run:
# cd ~/ocudu/build/apps/du
# ./odu -c du_n320_tdd_n78_40mhz.yaml e2 --addr="10.0.2.10" --bind_addr="10.0.2.1"
The DU brings up the radio, connects to the CU-CP over F1-C (
127.0.10.1:38472), and connects to the near-RT-RIC over E2AP. When you see==== DU started ====, the DU is ready.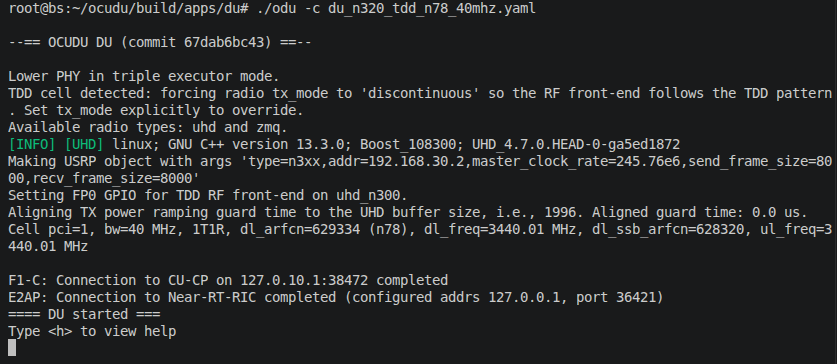
8c. Verify the RIC accepts the E2 setups. For FlexRIC, switch to the near-RT-RIC terminal. The RIC receives an E2 SETUP-REQUEST from the CU (RAN type
ngran_gNB/ngran_gNB_CUUP)…
…and a separate E2 SETUP-REQUEST from the DU (RAN type
ngran_gNB_DU). Each node’s RAN functions (E2SM-KPM and E2SM-RC) are accepted.
For the ORAN SC RIC, the E2 connections from both the CU and the DU are visible in the console logs, as shown below.
In the split mode the RIC tracks the CU and the DU as separate E2 nodes.
Bringing up the UE: On the UE container, run the UE start script. It automates the full bring-up: rebooting the Quectel radio, checking 5G NR registration, establishing the PDU session with Quectel Connection Manager, and detecting the assigned data interface.
# ./ue_start.shThe script performs the following steps automatically:
[1/4] Reboot the Quectel radio
[2/4] Check UE registration to the 5G network (retries if not yet registered)
[3/4] Start the PDU session using Quectel Connection Manager
[4/4] Detect the network interface and its IPv4 address
While the UE registers, the gNB/DU console shows the UE attaching to the cell.
After a successful run, the UE is assigned an IP address by the Session Management Function of the core network and a data interface (e.g.,
enxd282e9c1b604) is ready for user-plane testing. The script prints convenientpingandiperf3commands at the end for your reference.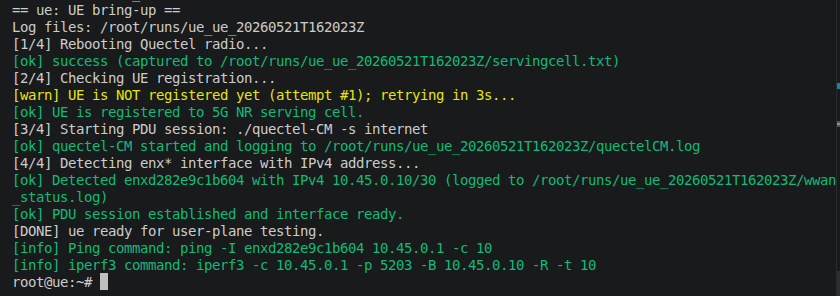
Note
If the script reports
Timed out waiting for enx* interfacethe PDU session did not come up. Re-run./ue_start.sh— the radio often needs a second reboot to register.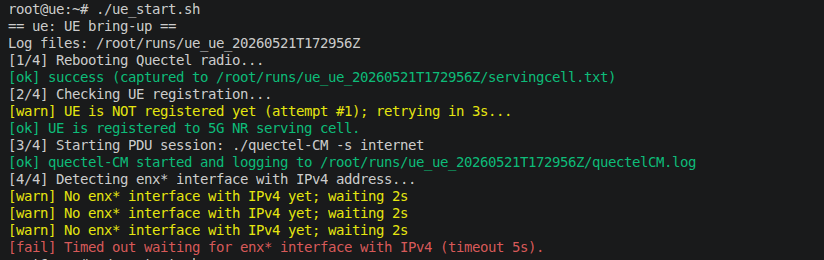
Monitoring Throughput with the xApp
Generate user-plane traffic: On the UE container, copy the
iperf3command printed byue_start.shand run it to measure downlink throughput from the core network to the UE. The-Rflag selects reverse (downlink) mode. Use a long duration so the xApp has time to collect KPM measurements while traffic is flowing. For example:# iperf3 -c 10.45.0.1 -p 5203 -B 10.45.0.10 -R -t 120
Note
Use your UE’s assigned IP address (from Step 9) in the
-Bflag.The
iperf3output shows the achieved throughput.
Starting the KPM monitor xApp: With iperf3 traffic flowing, start the KPM monitoring xApp in a new terminal of the Base Station container. The xApp subscribes to E2 nodes through the near-RT-RIC and collects per-UE downlink/uplink throughput metrics. Select the tab below for your chosen RIC.
Start the O-RAN KPM monitoring xApp. The xApp reads
xapp_moni_e2sm_kpm.conf, which requests theDRB.UEThpDlandDRB.UEThpUl(downlink/uplink per-UE throughput) measurements at a 1000 ms reporting period.# cd ~/flexric/build/examples/xApp/c/monitor # ./xapp_oran_moni -c ./xapp_moni_e2sm_kpm.conf
The xApp connects to the near-RT-RIC, exchanges an E42 SETUP with the RIC, and discovers the registered E2 node(s).
On the near-RT-RIC terminal you can see the xApp connecting and issuing the KPM subscription request toward the RAN function.

Note
The xApp discovers one E2 node in the monolithic deployment and two E2 nodes (CU and DU) in the OCU-ODU split deployment. The subscription and monitoring steps are otherwise identical.
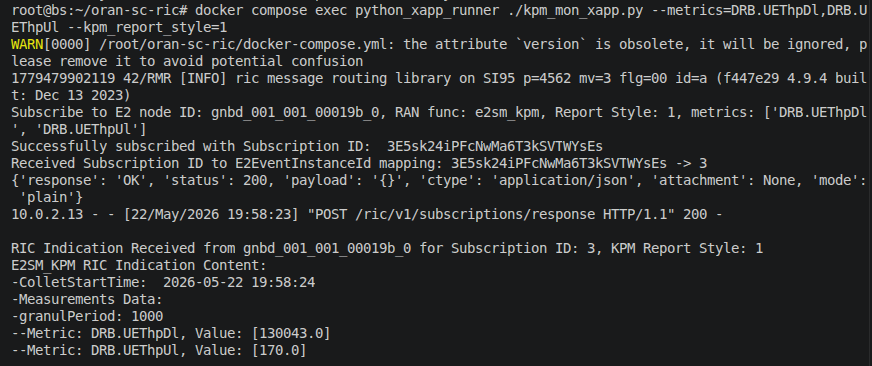
The KPM monitoring xApp runs inside the ORAN SC RIC Docker stack via the
python_xapp_runnerservice. Launch it by exec-ing into that container:# cd ~/oran-sc-ric # docker compose exec python_xapp_runner ./kpm_mon_xapp.py --metrics=DRB.UEThpDl,DRB.UEThpUl --kpm_report_style=1
The xApp connects to the ORAN SC near-RT-RIC and subscribes to KPM measurements from the registered E2 node(s), as shown below.

Note
Ensure the ORAN SC RIC Docker stack is fully healthy (
docker compose ps) before running this command. The xApp discovers one E2 node in the monolithic deployment and two E2 nodes (CU and DU) in the OCU-ODU split deployment.Observe the KPMs at the xApp: The xApp receives periodic KPM indication messages from the E2 node(s) and prints the per-UE downlink and uplink throughput (
DRB.UEThpDl/DRB.UEThpUl) collected through the near-RT-RIC. Select the tab for your chosen RIC to see the expected output.
Tip
In the OCU-ODU split deployment the xApp collects KPMs from both the CU and the DU E2 nodes, letting you observe the disaggregated RAN through a single near-RT-RIC.
Tip
In the OCU-ODU split deployment the ORAN SC RIC xApp collects KPMs from both the CU and the DU E2 nodes via the SC RIC E2 Termination service.
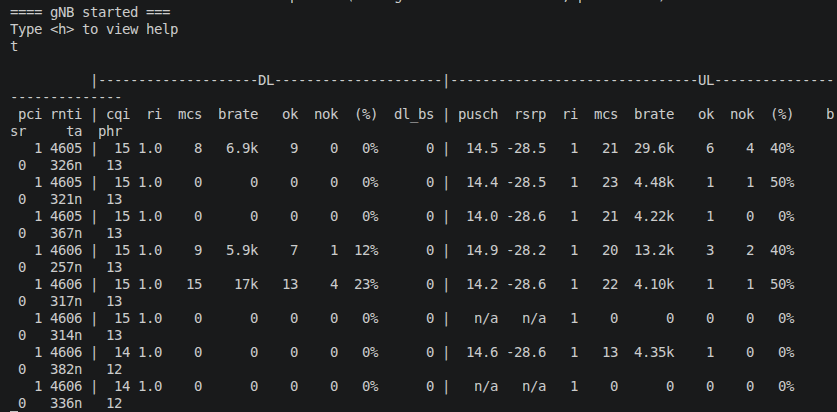
View the RAN node metrics: On the gNB (monolithic) or the DU (split) terminal, press
tfollowed byENTERto display the live per-UE radio metrics — PCI, RNTI, CQI, MCS, DL/UL bit-rate, PUSCH SNR, and packet success/drop counts — while theiperf3test runs.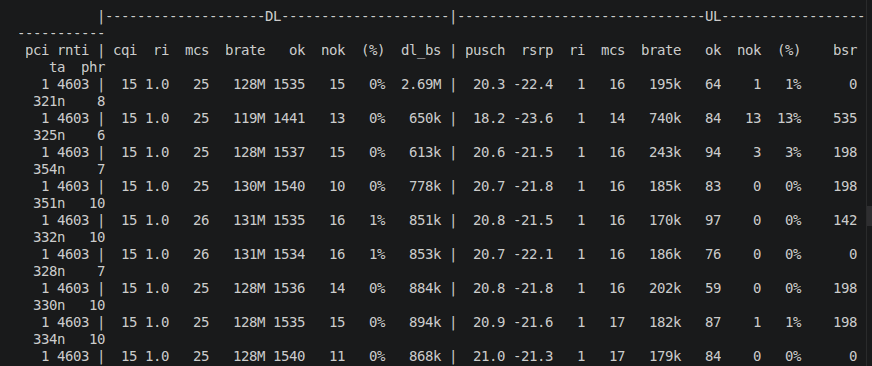
Troubleshooting
DU cannot connect to the CU (split mode): Ensure the O-CU was started before the O-DU and that it reports
F1-C: Listening for new connections. Restart the O-DU once the CU is ready.E2 node not visible to the xApp: Confirm the near-RT-RIC is still running and that the gNB/CU/DU console reported
E2AP: Connection to Near-RT-RIC completed. Verify the--addrflag matches the RIC’s actual IP address. Start the xApp only after the RAN node(s) have registered with the RIC.UE fails to establish a PDU session: If
ue_start.shtimes out waiting for theenx*interface, re-run the script.
Tip
If you want to perform weather measurements along with the RAN experiment, refer to ARA Weather APIs.